Microsoft did some great work on integrating Azure Websites and Team Foundation Service. It’s really easy to setup continuous deployment by creating a website, linking it to Team Foundation Service and kicking of a build.
But there is a downside to this. Each change will be published immediately to your production site! Not the best thing when you haven’t completely finished a feature or some styling needs be done.
So, what if we wanted to have a DTAP environment?
Last week I came across this post Multiple Environments with Windows Azure Web Sites which showed how you can setup a Staging/Production environment on Azure Website with Git.
I couldn’t find any information however how to do this with Team Foundation Service. But after searching the web and having some contact with Microsoft I found the necessary configuration steps and I want to share them with you in this blog.
Create a new Team Project in Team Foundation Server
To get started we first need a new project in Team Foundation Service and upload some code to it. On the TFS website you can find some good tutorials that will help you to get started if you don’t already have a project:
For this blog, I’ve created a new TFS Project ‘MyApp’ and added a default MVC 4 Internet application.
Create two websites in Windows Azure
Now that we have our code in place, we need to create two websites in Windows Azure. One website will contain your production ready site which is live for all your customers. The other site will be a free website where you can test changes before showing them to customers.
Creating a website is the easiest with Quick Create.
For this example, I’ve created two websites:
The Production site will run in Shared Mode so I can link my custom domain name to it. The staging website will run in free mode. It’s only for internal use and it won’t cost us any money!
Link to Team Foundation Service
The next step is to link our websites to our Team Foundation Service account. By default, this will setup a Continuous Integration Build that will deploy each check in automatically to our Azure Website.
Test it
Now that we have setup two websites and linked them to TFS we can test that our continuous deployment is working.
If we make a change to our MyApp project and check it in we will see that Team Foundation Service notices the change, queues two new builds and deploys to both our Azure Websites.
Both builds will run and after that we have the same code deployed to our staging and production environment.
Branch your code
Now we can start configuring the different branches for the staging and production environment.
Creating a branch in Visual Studio is a quick operation. I have two branches in Source Control:
We can now make changes to our Staging environment, test them and then merge them to our Main branch.
When working with multiple branches this extension changes the Visual Studio window title to include the parent folder. This makes it easier to see in which branch you’re working so you don’t make any mistakes.
Adjusting the build definition
When linking the Azure websites to TFS, a new build definition is created in your TFS project: ApplicationName-WebsiteName-CD (continuous deployment). Since we have linked two websites, we have two new build definitions.
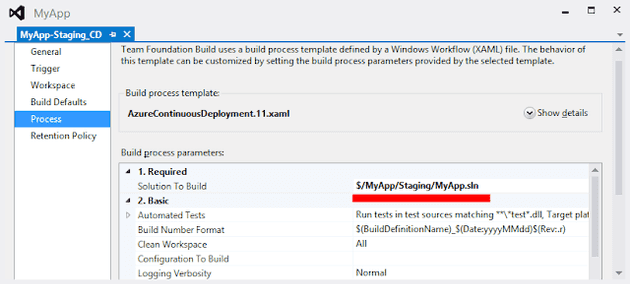
The build definition for the staging build, MyApp-Staging-CD, needs to be updated . We need to adjust the workspace mappings and it should point to the correct solution file.

We have to change the Workspace mapping for the Staging Build Definition. It will now point to MyAppMain and it should point to MyAppStaging.
Then we have to change the ‘Solution to Build’ in the Process settings. By default it will point to MyAppMainMyApp.sln.
One other thing we have to change is the UNC path in the Build Defaults.By default this is an incorrect UNC path for the drop folder. I have just switched to ‘This build does not copy output files to a drop folder’ so I could save the changes to my build definition file.
Run it
After saving our build definition we can make changes to both our Staging and Production branch. Each will be detected by the correct build definition and deployed to the Azure Website.
So, to recap:
- Link the two websites to your team project
- Branch your code
- Adjust the workspace mappings on the build definition to the staging site to map the branch
- Change the solution to build property on the build definition for your staging site to point to the solution in your branch
What do you think? Is it useful to support different branches for Azure Websites? Any features you miss? Please leave a comment!


